


Thank you for all your supportive comments on my last post. I’ve never been one to hold back on what I eat, but posting it on the internet for everyone to see is a whole different story. So thank you to each and every one of you for your honesty and support.
This week I’d like to share one of my favorite soups with you, Vietnamese sweet and sour soup. Let’s get down to business, shall we?

There is an ingredient in this recipe that is quite unfamiliar to many people. In Vietnamese it’s called bac ha. Upon googling bac ha, I found that the English name is known as Elephant Ear. This vegetable is sold in stalks at Asian grocery stores.

The insides are quite spongy looking. When cooked, they absorb a lot of soup and have a slight crunch when bitten into. This is my favorite vegetable in this soup. If you cannot find this, you can easily substitute with celery. Have you tried this vegetable before?

(Feeds eight)
Ingredients:

Instructions:
To prepare tamarind pulp, empty a 227 gram bag of tamarind into a bowl. Add 2/3 cups hot water (not boiling water) to submerge the tamarind for about 15 minutes. Once cooled, squeeze the seeds out of the pulp and press pulp through a fine strainer.
Have all your vegetables washed, cut up and ready to be added into the soup.

Heat up oil in a 9 quarts pot and fry minced garlic until golden brown.
Add vegetable broth and water. Keep heat at high and bring broth to a boil. Once broth boils, add in shrimp. Cook shrimp until they turn pink and have fully curled up. Remove shrimp from the soup so they don’t shrink and set aside for later.
Add in all vegetables and bring soup to a boil.

Once boiling, allow vegetables to continue to cook for another 15 minutes.

When ready to serve, return shrimps back into the soup and boil for another 2 minutes. Serve immediately before shrimp start to shrink.

Note: Use shrimp with heads and shell on for better presentation and flavor in the soup. I ran out and had to use whatever shrimp I had in my freezer.

We ate this with rice, but you can also eat it with vermicelli noodles. The sauce you see on the side is a mixture of 3 tablespoons fish sauce, 1 tablespoon lime juice, and 1 sliced red chili pepper. It is used as a dip to accompany the vegetables and shrimp when eating with rice. If you like spicy soup, you can definitely add chili sauce or red chili peppers. I left those out of this recipe for the sakes of my kiddies. Cut the recipe in half if you’re not planning on feeding more than four people.
My mom makes this soup with fish instead of shrimp and sometimes adds okra. You can even substitute the shrimp with chicken if you don’t like seafood. If you want a vegetarian version, substitute the shrimp with tofu and the fish sauce with soy sauce. This soup is quite versatile and everybody can enjoy it.
I hope you’re all having a wonderful week. Until next time, friends and family .
.
This week I’d like to share one of my favorite soups with you, Vietnamese sweet and sour soup. Let’s get down to business, shall we?

There is an ingredient in this recipe that is quite unfamiliar to many people. In Vietnamese it’s called bac ha. Upon googling bac ha, I found that the English name is known as Elephant Ear. This vegetable is sold in stalks at Asian grocery stores.

The insides are quite spongy looking. When cooked, they absorb a lot of soup and have a slight crunch when bitten into. This is my favorite vegetable in this soup. If you cannot find this, you can easily substitute with celery. Have you tried this vegetable before?

(Feeds eight)
Ingredients:
- 2 liters vegetable broth
- 500 ml water
- 3 cloves garlic, minced
- 2 tbsp cooking oil
- 3 – 4 stalks bac ha sliced into half inch thick slices
- 1 cup chopped pineapple
- 2 tomatoes, chopped
- 2 cups king oyster mushrooms sliced into 2 inch lengths
- 2 cups oyster mushrooms separated by the stem
- 2 cups bean sprouts
- 3 tbsp sugar
- 4 tbsp fish sauce
- 7 tbsb tamarind pulp (more or less to taste, I like my soup more on the sour side)
- 1 – 2 lbs shrimp (preferably head and shell on)

Instructions:
To prepare tamarind pulp, empty a 227 gram bag of tamarind into a bowl. Add 2/3 cups hot water (not boiling water) to submerge the tamarind for about 15 minutes. Once cooled, squeeze the seeds out of the pulp and press pulp through a fine strainer.
Have all your vegetables washed, cut up and ready to be added into the soup.

Heat up oil in a 9 quarts pot and fry minced garlic until golden brown.
Add vegetable broth and water. Keep heat at high and bring broth to a boil. Once broth boils, add in shrimp. Cook shrimp until they turn pink and have fully curled up. Remove shrimp from the soup so they don’t shrink and set aside for later.
Add in all vegetables and bring soup to a boil.

Once boiling, allow vegetables to continue to cook for another 15 minutes.

When ready to serve, return shrimps back into the soup and boil for another 2 minutes. Serve immediately before shrimp start to shrink.

Note: Use shrimp with heads and shell on for better presentation and flavor in the soup. I ran out and had to use whatever shrimp I had in my freezer.

We ate this with rice, but you can also eat it with vermicelli noodles. The sauce you see on the side is a mixture of 3 tablespoons fish sauce, 1 tablespoon lime juice, and 1 sliced red chili pepper. It is used as a dip to accompany the vegetables and shrimp when eating with rice. If you like spicy soup, you can definitely add chili sauce or red chili peppers. I left those out of this recipe for the sakes of my kiddies. Cut the recipe in half if you’re not planning on feeding more than four people.
My mom makes this soup with fish instead of shrimp and sometimes adds okra. You can even substitute the shrimp with chicken if you don’t like seafood. If you want a vegetarian version, substitute the shrimp with tofu and the fish sauce with soy sauce. This soup is quite versatile and everybody can enjoy it.
I hope you’re all having a wonderful week. Until next time, friends and family
Deep fried oyster wraps. Yes, you read right, deep fried oyster wraps. Don’t knock em till you’ve tried em  . I wasn’t going to post this because well… honestly? I was a bit ashamed to. It’s no secret, when some people hear the words ”deep fried”, they turn and run in the other direction. So when the BFF came over and asked if I’ve been making anything new? These of course came straight to mind (there are no secrets between BFF’s). Then when she asked if I was going to do a post on them, my response was, “Heck no, woman! Are you crazy?!’. The truth was that I didn’t want the blogging world knowing that I eat this kind of stuff. By “this kind of stuff” I mean something Richard Simmons wouldn’t touch even with a five foot pole.
Truth be told, I’m no Richard Simmons. I mean, dude is adorable and all but, well…let’s just stop there for both our sakes. Anyways, this is what I eat, this is my blog, and I really enjoyed the meal so why not share it? My blog is not a health blog and I am not here to try to make myself look like an all around healthy eater. So BFF, this one’s for you . This recipe makes about 6 oysters. I used one oyster per wrap. My hubby, also known as “The Hungry Hubby”, used 2 oysters per wrap. What veggies you choose to use in the wrap is up to you. Also, I don’t have a deep fryer so these instructions are for deep frying in a 5 – 6 quart sauce pan.
Ingredients for deep fried oysters (makes about 6 medium sized oysters):
1. Have everything for deep frying laid out and ready to go. Place flour, eggs, and bread crumbs in separate containers.
2. Fill a sauce pan with enough vegetable oil to cover two oysters at a time and heat the oil on high heat for five minutes.
3. After five minutes, turn oil down to medium heat.
4. Roll oyster around in flour until completely covered. Shake off extra flour.

5. Dip oyster in eggs until fully covered. Flip to cover the other side.

6. Roll oyster in Panko bread crumbs until fully covered.

7. Carefully and slowly slide oyster into the oil and fry for about one and a half minutes per side or until both sides are golden brown. (No longer than two minutes per side.)
8. Drain fried oysters on paper towel.

Because I’m such a (in the words of my hubby) “DORK”, no worries, I’ve called him much worse (naughty wink and smirk), I used my tomato plate in an attempt to make it look more healthy, but who am I kidding? This is pure guilty pleasure. There, consider that your warning .
Ingredients for wraps: (makes 2 wraps)

I bought this Thai sweet red chili sauce from Costco – LOVE IT!

The assembly:

A bit of an Asian wrap, I’d say .
.

Can’t forget my beloved cheese .
.

This is optional, but I wrapped it and microwaved it for 30 seconds just to melt the cheese. I like my cheese ooey gooey. I left one end open because it was too hard to wrap up both ends.
Peek-a-boo.

I-see-you!

See those streaks? Sauce started dripping out the bottom end so I shamelessly tried to swipe it up with my wrap.

This was the best wrap I’ve ever had. Hubby agreed and we both wondered why nobody sells these (not that we know of at least). They’re so so easy, quick, and delicious. Definitely not an eat two or three times a week type of meal, but if you’re looking for something quick, fun, a bit naughty and delicious to eat, this is your meal. If you don’t have the sauce, please look for it. This sauce and the deep fried oysters are the stars of this meal. This recipe and wrap would work well with shrimp also. Enjoy!
I washed this down with some Chrysanthemum Tea.

Chrysanthemum tea is known to help aid digestion of greasy foods. It is also ”classified as a cool, acrid herb which is good for relieving heat of the upper body“. You can read more about the benefits and nutritional value of chrysanthemum tea here.
So, BFF…when are you coming over for some deep fried oyster wraps? Oh, and it’s obvious by now that I have no problem using the term BFF like a giddy little teenage girl. No offense to any teenage girls reading this. If anything, I’d much rather be your age again, trust me. Until next time, friends and family .
Truth be told, I’m no Richard Simmons. I mean, dude is adorable and all but, well…let’s just stop there for both our sakes. Anyways, this is what I eat, this is my blog, and I really enjoyed the meal so why not share it? My blog is not a health blog and I am not here to try to make myself look like an all around healthy eater. So BFF, this one’s for you
Ingredients for deep fried oysters (makes about 6 medium sized oysters):
- 1/3 cup all purpose flour
- 2 large eggs beaten
- 1 cup Panko bread crumbs
- 2 quarts vegetable oil (or just enough to cover the oysters)
1. Have everything for deep frying laid out and ready to go. Place flour, eggs, and bread crumbs in separate containers.

2. Fill a sauce pan with enough vegetable oil to cover two oysters at a time and heat the oil on high heat for five minutes.
3. After five minutes, turn oil down to medium heat.
4. Roll oyster around in flour until completely covered. Shake off extra flour.

5. Dip oyster in eggs until fully covered. Flip to cover the other side.

6. Roll oyster in Panko bread crumbs until fully covered.

7. Carefully and slowly slide oyster into the oil and fry for about one and a half minutes per side or until both sides are golden brown. (No longer than two minutes per side.)
8. Drain fried oysters on paper towel.

Because I’m such a (in the words of my hubby) “DORK”, no worries, I’ve called him much worse (naughty wink and smirk), I used my tomato plate in an attempt to make it look more healthy, but who am I kidding? This is pure guilty pleasure. There, consider that your warning
Ingredients for wraps: (makes 2 wraps)
- 1 handful spinach
- 1 handful bean sprouts
- 1 small sweet pepper sliced into strips
- 1/2 cup shredded cheese
- Thai sweet red chili sauce
- 2 tortilla shells
- 1 or 2 deep fried oysters per wrap

I bought this Thai sweet red chili sauce from Costco – LOVE IT!

The assembly:

A bit of an Asian wrap, I’d say

Can’t forget my beloved cheese

This is optional, but I wrapped it and microwaved it for 30 seconds just to melt the cheese. I like my cheese ooey gooey. I left one end open because it was too hard to wrap up both ends.
Peek-a-boo.

I-see-you!

See those streaks? Sauce started dripping out the bottom end so I shamelessly tried to swipe it up with my wrap.

This was the best wrap I’ve ever had. Hubby agreed and we both wondered why nobody sells these (not that we know of at least). They’re so so easy, quick, and delicious. Definitely not an eat two or three times a week type of meal, but if you’re looking for something quick, fun, a bit naughty and delicious to eat, this is your meal. If you don’t have the sauce, please look for it. This sauce and the deep fried oysters are the stars of this meal. This recipe and wrap would work well with shrimp also. Enjoy!
I washed this down with some Chrysanthemum Tea.

Chrysanthemum tea is known to help aid digestion of greasy foods. It is also ”classified as a cool, acrid herb which is good for relieving heat of the upper body“. You can read more about the benefits and nutritional value of chrysanthemum tea here.
So, BFF…when are you coming over for some deep fried oyster wraps? Oh, and it’s obvious by now that I have no problem using the term BFF like a giddy little teenage girl. No offense to any teenage girls reading this. If anything, I’d much rather be your age again, trust me. Until next time, friends and family
Had another dinner at Pagolac restaurant, but south side this time. I’ve blogged about this restaurant before here. We started out with the deep fried squid.

Then had some butter garlic chicken wings. The other two dishes are raw beef, shrimp, and squid.

Don’t worry, we didn’t eat them sashimi style. They were cooked in this mini hot-pot with sliced white and green onions and a vinegar-y broth.

Then wrapped with vermicelli in rice paper.

Don’t forget the veggies.

Fish sauce, not straight out of the bottle though. This is mixed with sugar, lime juice, water and white vinegar. Most of the time you’ll also find shredded carrots and chopped garlic in your fish sauce at Vietnamese restaurants.

This was not on the menu but the owner made us two dishes of deep fried soft-shell crab. The sauce in the middle is just mayonnaise. Needless to say, this was my favorite dish. If you’ve never had soft-shell crab before, I highly recommend it. The whole crab is dipped in a tempura batter and deep fried. Yes, you eat everything including the shells.

Ended the night with a group picture. From left to right: Pagolac’s owner (uncle), Mom’s friend from Yellow Knife, Dad, Mom, myself , and of course my kiddies. Yes, that’s why we keep going to Pagolac, cause it’s family owned. Don’t get me wrong though, we still pay when we go. Do you see the resemblance between the owner and my Dad?

And there’s my uncle with his famous, “I can dance while balancing a beer bottle on my head” performance. Gosh I love him!

Since this is a family owned restaurant, I didn’t want to comment on the dishes and risk sounding biased. Guess you’ll just have to try for yourselves . This post was actually in my drafts folder so it’s an older one that I forgot to post.
Have you ever tried soft shell crab before? If you ever get a chance to try it, I highly recommend it. Until next time, friends and family .

Then had some butter garlic chicken wings. The other two dishes are raw beef, shrimp, and squid.

Don’t worry, we didn’t eat them sashimi style. They were cooked in this mini hot-pot with sliced white and green onions and a vinegar-y broth.

Then wrapped with vermicelli in rice paper.

Don’t forget the veggies.

Fish sauce, not straight out of the bottle though. This is mixed with sugar, lime juice, water and white vinegar. Most of the time you’ll also find shredded carrots and chopped garlic in your fish sauce at Vietnamese restaurants.

This was not on the menu but the owner made us two dishes of deep fried soft-shell crab. The sauce in the middle is just mayonnaise. Needless to say, this was my favorite dish. If you’ve never had soft-shell crab before, I highly recommend it. The whole crab is dipped in a tempura batter and deep fried. Yes, you eat everything including the shells.

Ended the night with a group picture. From left to right: Pagolac’s owner (uncle), Mom’s friend from Yellow Knife, Dad, Mom, myself , and of course my kiddies. Yes, that’s why we keep going to Pagolac, cause it’s family owned. Don’t get me wrong though, we still pay when we go. Do you see the resemblance between the owner and my Dad?

And there’s my uncle with his famous, “I can dance while balancing a beer bottle on my head” performance. Gosh I love him!

Since this is a family owned restaurant, I didn’t want to comment on the dishes and risk sounding biased. Guess you’ll just have to try for yourselves
Have you ever tried soft shell crab before? If you ever get a chance to try it, I highly recommend it. Until next time, friends and family
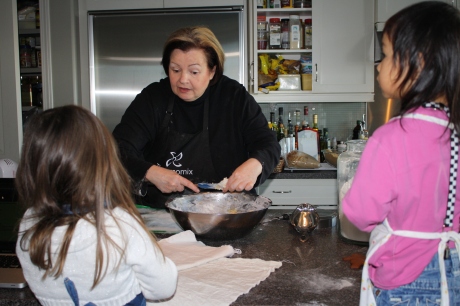
A couple of weeks ago I was able to attend the Greek Escapes cooking class, one of Valerie’s culinary classes. We learned how to make hummus, babaganoush, tzatziki, roasted red pepper salad, and olive oil flatbread.

Unfortunately I only snapped a few pictures because well, I was too busy learning how to cook. For that reason, I wasn’t going to do a post on this so I didn’t take anymore pictures when I was done cooking either. I was just going to wait for Valerie’s post so I could comment on how great the class was, but when I heard that Valerie’s pictures didn’t turn out and she wasn’t able to do a post either, I felt really bad. So my dear friend, this post is for you. I hope my flatbread makes you proud.
When we arrived at 8:30 in the morning, Valerie had already laid out this beautiful spread for us. Talk about treating your guests and customers right.

The cooking stations were all ready to go as well. Unfortunately, this was the last picture I got for that cooking lesson. There were 6 of us and believe me, we were all busy, busy, busy (in a good way of course).

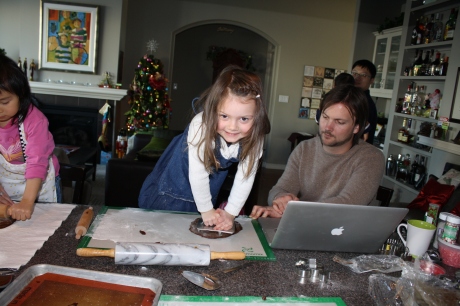
Originally I wanted to take the class to learn how to make her amazing red pepper salad. I first got a taste of it at Valerie’s taste tripping party (if I remember correctly). Those were the best red peppers I had ever tasted, so I knew this class was my chance to learn.
As I mentioned above, we made hummus, tzatziki, babaganoush, red pepper salad, and flatbread. I had never even heard of babaganoush until that day, but my first taste blew me away. I absolutely loved it! Even though it’s a dip, I ate it by the spoonfuls when I got home – so good! Although everything tasted fantastic, I’d have to say that the star of the lesson for me was the flatbread.
I wished I had gotten a better picture of it, but when I got home my little savages tore right into it. Ok so did I, but can you blame me? Look at this beauty. Well, what’s left of it in this picture anyways.

That wonderful perfectly baked to a golden brown top, sprinkled with fresh rosemary and coarse salt fluffiness had me dreaming of bread making all week. I was in love, in love with the taste of this glorious bread and in love with bread making; and when you’re in love, you chase the object of your affection. Am I right foodies?


Those smiles right there are the reason why I’m learning to bake.
Valerie is a Richard Bertinet fan, so the technique she taught us to knead our dough was the same technique she learned from Mr. Bertinet himself. For all you bread making lovers (yes Denise and Biren, I’m talking to you) here’s a link to a video of this unique technique. (Thank you for emailing me that link,Valerie.)
After learning this technique and tasting that wonderful olive oil flatbread, I fell in love with bread making. Valerie not only taught me the technique, but she installed baking confidence in me. Confidence that lead me to make my very first bread on my own (bread that involves kneading, that is). If you’ve been reading this blog for a while, you’ll know that baking and I aren’t very good friends, so for me to actually feel confident in baking is pretty huge.

This dough was so soft and smooth (yes, kinda like a baby’s bum bum), it blew me away.


Salting the bread before putting it into the oven. You’ll notice I chose to leave out the rosemary as my kiddies were not big fans of it. I highly recommend it though.

Such a classic baking picture isn’t it?

The bread is finally done. Putting one last layer of olive oil on it. Mmm…olive oil.

It didn’t look as pretty without the rosemary though. Valerie, I hope I’ve made you proud with this bread. Thank you for the wonderful cooking lessons, I will never forget them. I’m sorry your pictures didn’t turn out. Hopefully this will at least put a smile on your face and a warm feeling in your heart

The next day, kiddies had this for a snack (one piece each). I don’t think I will ever buy a bread making machine, kneading is just too fun. Why let the machine have all the fun, right?
So tell me, do you have a favorite bread recipe? Feel free to add links to your comments. Until next time friends and family. Happy bread making
Olive Oil Flatbread (recipe from the Greek Escapes class)
Ingredients

Unfortunately I only snapped a few pictures because well, I was too busy learning how to cook. For that reason, I wasn’t going to do a post on this so I didn’t take anymore pictures when I was done cooking either. I was just going to wait for Valerie’s post so I could comment on how great the class was, but when I heard that Valerie’s pictures didn’t turn out and she wasn’t able to do a post either, I felt really bad. So my dear friend, this post is for you. I hope my flatbread makes you proud.
When we arrived at 8:30 in the morning, Valerie had already laid out this beautiful spread for us. Talk about treating your guests and customers right.

The cooking stations were all ready to go as well. Unfortunately, this was the last picture I got for that cooking lesson. There were 6 of us and believe me, we were all busy, busy, busy (in a good way of course).

Originally I wanted to take the class to learn how to make her amazing red pepper salad. I first got a taste of it at Valerie’s taste tripping party (if I remember correctly). Those were the best red peppers I had ever tasted, so I knew this class was my chance to learn.
As I mentioned above, we made hummus, tzatziki, babaganoush, red pepper salad, and flatbread. I had never even heard of babaganoush until that day, but my first taste blew me away. I absolutely loved it! Even though it’s a dip, I ate it by the spoonfuls when I got home – so good! Although everything tasted fantastic, I’d have to say that the star of the lesson for me was the flatbread.
I wished I had gotten a better picture of it, but when I got home my little savages tore right into it. Ok so did I, but can you blame me? Look at this beauty. Well, what’s left of it in this picture anyways.

That wonderful perfectly baked to a golden brown top, sprinkled with fresh rosemary and coarse salt fluffiness had me dreaming of bread making all week. I was in love, in love with the taste of this glorious bread and in love with bread making; and when you’re in love, you chase the object of your affection. Am I right foodies?


Those smiles right there are the reason why I’m learning to bake.
Valerie is a Richard Bertinet fan, so the technique she taught us to knead our dough was the same technique she learned from Mr. Bertinet himself. For all you bread making lovers (yes Denise and Biren, I’m talking to you) here’s a link to a video of this unique technique. (Thank you for emailing me that link,Valerie.)
After learning this technique and tasting that wonderful olive oil flatbread, I fell in love with bread making. Valerie not only taught me the technique, but she installed baking confidence in me. Confidence that lead me to make my very first bread on my own (bread that involves kneading, that is). If you’ve been reading this blog for a while, you’ll know that baking and I aren’t very good friends, so for me to actually feel confident in baking is pretty huge.

This dough was so soft and smooth (yes, kinda like a baby’s bum bum), it blew me away.


Salting the bread before putting it into the oven. You’ll notice I chose to leave out the rosemary as my kiddies were not big fans of it. I highly recommend it though.

Such a classic baking picture isn’t it?

The bread is finally done. Putting one last layer of olive oil on it. Mmm…olive oil.

It didn’t look as pretty without the rosemary though. Valerie, I hope I’ve made you proud with this bread. Thank you for the wonderful cooking lessons, I will never forget them. I’m sorry your pictures didn’t turn out. Hopefully this will at least put a smile on your face and a warm feeling in your heart

The next day, kiddies had this for a snack (one piece each). I don’t think I will ever buy a bread making machine, kneading is just too fun. Why let the machine have all the fun, right?
So tell me, do you have a favorite bread recipe? Feel free to add links to your comments. Until next time friends and family. Happy bread making
Olive Oil Flatbread (recipe from the Greek Escapes class)
Ingredients
- 18 ounces, 475g, 3 3/4 to 3 7/8 cups white bread flour
- 2 tablespoons, 30g semolina
- 1/2 ounce fresh, 1/3 ounce dry, 1 1/2 teaspoons dry yeast
- 2 tablespoons really good fine grain salt (sea salt)
- 5 tablespoons EVOO
- 11 1/2 ounces, just over 12 fl oz, 350g water
- 4 tablespoons EVOO or more
- few sprigs of rosemary
- good quality coarse salt
- Preheat oven to 500 F.
- Mix flour and semolina; rub the yeast with finger tips.
- Add salt, EVOO, and water all at once into the bowl.
- Mix ingredients until they come together in the bowl and mix for a few minutes more.
- Turn the dough out onto a very, very lightly floured surface and work the dough until it is ready to proof.
- Rest dough in an oiled bowl for one hour covered with a lint free cloth in a warm place.
- Use rounded end of the scraper and turn dough out on an oiled tray.
- Drizzle oil over the dough; use fingers to push and prod the dough to spread it from the centre toward the edges of the tray trying NOT to stretch or pull it.
- Cover with lint free dish towel and rest warm and draft free for 45 minutes.
- Prod the dough again, dimpling it with your fingers, and rest for 30 minutes more.
- Take rosemary needles and push them gently in evenly over the dough.
- Sprinkle dough with coarse salt and immediately put it in preheated oven.
- Turn heat down to 425 F for 25 to 30 minutes until light golden brown.
- Cook on wire rack and brush with EVOO while still hot.
Most of my family are out of town this Chinese New Year so there won’t be any big feast for us. I just wanted to take this time to wish all my Chinese and Vietnamese readers a happy and prosperous

I’ll be back after the weekend with a food post, I promise. Until next time, friends and family .

I’ll be back after the weekend with a food post, I promise. Until next time, friends and family
Hi everyone! Sorry I’ve been MIA lately. Since we got back from Vancouver, I’ve been doing a lot of shoveling everyday. Finally got a break this week and the snow is starting to melt . Check it:

I’ve also been busy trying to finish up a guest post for my dear friend and fellow food blogger, Mary. Please join me on her blog this week over at Keep Learning, Keep Smiling for my guest post. Don’t forget to check out Mary’s blog while you’re there. She has fantastic dishes and is also one of the nicest people you could meet in this blogosphere. Hope to see you there. Thanks for stopping by everyone!

I’ve also been busy trying to finish up a guest post for my dear friend and fellow food blogger, Mary. Please join me on her blog this week over at Keep Learning, Keep Smiling for my guest post. Don’t forget to check out Mary’s blog while you’re there. She has fantastic dishes and is also one of the nicest people you could meet in this blogosphere. Hope to see you there. Thanks for stopping by everyone!
Thank you for the warm comments left on my last post everyone. You all are too sweet. I hope you had a great holiday and happy new year. We just got back from visiting my in-laws in Vancouver. While we were there, Edmonton had a bad snow storm. This is what we came back to: (sorry for the bad iPhone pics)

Hubby and I took turns “digging” cause it was way too much for one person to handle. Plus, someone had to keep and eye on the holy terrors .

A couple of hours later the driveway was finally cleared. Time to invest in a snow blower? Haha. Still proud to be Canadian though. Good thing is, at least the kiddies had fun with the snow. Now onto the title of this post.
I’d like to share this simple sesame chicken recipe with you that I promised from the dinner we had with Valerie and Vanja.

Serves 4 to 6 people.
Ingredients:
Fill a pot big enough to hold your chicken with water to about 3/4 full. When water boils, put in your chicken and boil it for about half an hour to 45 minutes (depending on the size of your chicken) or until chicken is fully cooked. Once the chicken is cooked, take it out and allow to rest for about 10 minutes.
While chicken is cooling and resting, put your Shanghai Bok Choy into the chicken broth to cook. If you like your veggies crispy, boil for about 3 to 5 minutes. If you like your veggies soft, boil for about 10 minutes. Drain the veggies and leave to cool. While the veggies are cooling chop up the chicken.

In a big bowl (big enough to fit all the chicken pieces) mix together the sesame oil, salt, pepper, and MSG. Put all the chicken pieces in with the sesame mixture and give it a couple tosses. Make sure to coat all the chicken pieces.

To plate, in a medium bowl (just big enough to fit all the pieces of chicken) line the edge of the bowl with pieces of Shanghai Bok Choy as shown in the picture below.

Once done, line the bowl with pieces of chicken breast all around, then finish with the rest of the chicken meat filling up the middle. Turn the bowl upside down onto a plate. Cut the bunches of Shanghai Bok Choy in half and place them around the edge of the plate surrounding the chicken. It should look something like the picture below.
To finish the dish, in a bowl mix together chicken bouillon, cornstarch, and water. Stir until everything dissolves. Heat one tsp oil in a sauce pan. When oil is hot, add garlic. As soon as the garlic starts to brown, pour in the chicken bouillon mixture and stir. When mixture thickens, pour it over the plated chicken.

You can also grind more pepper onto the chicken at this point if you wish. Sprinkle some sesame seed onto your chicken (we left it out cause we forgot) and enjoy. We ate this with rice, but it would also go well with noodles.
That’s it for this week. Wherever you are, I hope you’re not snowed in like were were. Until next time, friends and family .

Hubby and I took turns “digging” cause it was way too much for one person to handle. Plus, someone had to keep and eye on the holy terrors

A couple of hours later the driveway was finally cleared. Time to invest in a snow blower? Haha. Still proud to be Canadian though. Good thing is, at least the kiddies had fun with the snow. Now onto the title of this post.
I’d like to share this simple sesame chicken recipe with you that I promised from the dinner we had with Valerie and Vanja.

Serves 4 to 6 people.
Ingredients:
- 1 packet Shanghai Bok Choy
- 1 whole chicken
- 2 cloves garlic (minced)
- 3 to 5 Tbsp sesame oil
- 1/2 tsp salt
- a pinch of pepper
- a pinch of MSG (optional, my mom uses it, I prefer not to)
- sesame seeds
- 1 tsp cornstarch
- 1 tsp chicken bouillon
- 1/2 bowl water
Fill a pot big enough to hold your chicken with water to about 3/4 full. When water boils, put in your chicken and boil it for about half an hour to 45 minutes (depending on the size of your chicken) or until chicken is fully cooked. Once the chicken is cooked, take it out and allow to rest for about 10 minutes.
While chicken is cooling and resting, put your Shanghai Bok Choy into the chicken broth to cook. If you like your veggies crispy, boil for about 3 to 5 minutes. If you like your veggies soft, boil for about 10 minutes. Drain the veggies and leave to cool. While the veggies are cooling chop up the chicken.

In a big bowl (big enough to fit all the chicken pieces) mix together the sesame oil, salt, pepper, and MSG. Put all the chicken pieces in with the sesame mixture and give it a couple tosses. Make sure to coat all the chicken pieces.

To plate, in a medium bowl (just big enough to fit all the pieces of chicken) line the edge of the bowl with pieces of Shanghai Bok Choy as shown in the picture below.

Once done, line the bowl with pieces of chicken breast all around, then finish with the rest of the chicken meat filling up the middle. Turn the bowl upside down onto a plate. Cut the bunches of Shanghai Bok Choy in half and place them around the edge of the plate surrounding the chicken. It should look something like the picture below.
To finish the dish, in a bowl mix together chicken bouillon, cornstarch, and water. Stir until everything dissolves. Heat one tsp oil in a sauce pan. When oil is hot, add garlic. As soon as the garlic starts to brown, pour in the chicken bouillon mixture and stir. When mixture thickens, pour it over the plated chicken.

You can also grind more pepper onto the chicken at this point if you wish. Sprinkle some sesame seed onto your chicken (we left it out cause we forgot) and enjoy. We ate this with rice, but it would also go well with noodles.
That’s it for this week. Wherever you are, I hope you’re not snowed in like were were. Until next time, friends and family
Growing up, my family never really celebrated Christmas much. We put up Christmas lights if the person responsible for the chore felt like doing it that year, we hardly ever exchanged gifts, we never got a Christmas tree until after living in Canada for about 10 plus years (that was the first and final year we ever got one), and we always had Chinese food on Christmas Eve. So as you can see, I guess you can say I was quite Christmas deprived.
As a child, I envied how other children got to help put up the Christmas tree, open gifts on Christmas day, enjoy their beautifully lit house, and even eat turkey (sounds kind of silly now). As I grew up, I got used to not doing all those things.
Then one Christmas Eve, everything changed. You were born.
")
Yes, you (on the right) were the exact replica of your Dad (on the left),

but I was just fine with that, because although you looked like him, you did things like me.
You slept like me.

You dressed like me.

You had a temper like me when someone tried to take away your food.

You even cleaned (or as Dad would call it, OCD-ed) like me.
I gave you life, but you taught me the true meaning of life. This Christmas you even gave me the best present ever (other than your birth of course).


It was a mold of your handprint, and written on the back was this poem:


Ever since you came into my life, you changed Christmas Eve forever. I promise to make every Christmas Eve as magical for you (and your little sidekick) every year as you have made it for me.


With all my love, always and forever,
Mommy <3
I also want to take this time to thank all my wonderful readers for dropping by every week and visiting. I hope you all had a Merry Christmas and happy holidays with your loved ones. Wishing you a Happy New Year filled with love, joy, prosperity, good fortune, and good health!

Doesn’t our legislature building look totally different (and beautiful) in the winter?

Thanks for stopping by again everyone. I promise there will be food in my next post. Until next time, friends and family.
As a child, I envied how other children got to help put up the Christmas tree, open gifts on Christmas day, enjoy their beautifully lit house, and even eat turkey (sounds kind of silly now). As I grew up, I got used to not doing all those things.
Then one Christmas Eve, everything changed. You were born.
")
Yes, you (on the right) were the exact replica of your Dad (on the left),

but I was just fine with that, because although you looked like him, you did things like me.
You slept like me.
You dressed like me.

You had a temper like me when someone tried to take away your food.
You even cleaned (or as Dad would call it, OCD-ed) like me.
I gave you life, but you taught me the true meaning of life. This Christmas you even gave me the best present ever (other than your birth of course).


It was a mold of your handprint, and written on the back was this poem:


Ever since you came into my life, you changed Christmas Eve forever. I promise to make every Christmas Eve as magical for you (and your little sidekick) every year as you have made it for me.


With all my love, always and forever,
Mommy <3
I also want to take this time to thank all my wonderful readers for dropping by every week and visiting. I hope you all had a Merry Christmas and happy holidays with your loved ones. Wishing you a Happy New Year filled with love, joy, prosperity, good fortune, and good health!

Doesn’t our legislature building look totally different (and beautiful) in the winter?

Thanks for stopping by again everyone. I promise there will be food in my next post. Until next time, friends and family.
The Good:
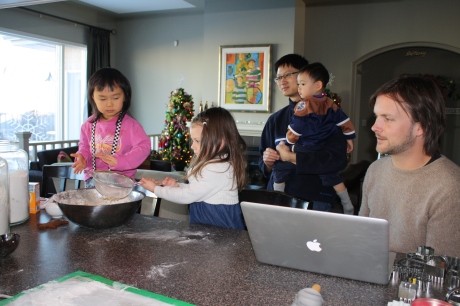
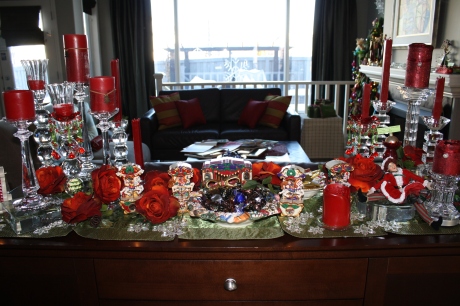
If you don’t believe real friendships can be made through blogging, BELIEVE because here’s proof. My family and I had the pleasure of having the oh so inspiring Valerie from A Canadian Foodie and her very charming husband Vanja, over for dinner at my parent’s house. After Valerie invited hubby and I to her taste tripping party and my two holy terrors over again to her house for some cookie making fun, I knew I had to do something in return to thank her. So dinner and a lesson in making XO sauce it was (so I thought) . I’ll explain “so I thought” later.
If you haven’t met Valerie yet, you sure are missing out! Not only does this woman make amazing dishes from her own family recipes, but her enthusiasm and eagerness to learn makes her a human walking cookbook expanding with recipes by the day. She is one of the warmest, most sincere, generous and inspirational people you’ll ever meet. She sees no colour, difference in age or difference in sex when she welcomes you into her heart (and home). A true Canadian indeed.
This was the first time I really got to talk to Vanja and get to know him better. He’s quite the gentleman and very charming, might I add; even offered to wash dishes after dinner. Valerie, you’ve got a keeper there . You two make the perfect couple. I usually have to give my dishwasher a few boots before he it starts working properly…teehee.
The Bad:
I wanted to invite Valerie over to my house, but since my Mom was going to demonstrate her XO sauce, I thought it’d be better to have the dinner and lesson at my parents’ house. Turned out, Mom misunderstood me. She thought I wanted her to show us just the ingredients and explain her method. There was no demonstration. I was so embarrassed and disappointed, but I had to keep my cool as I didn’t want to ruin the rest of the evening. My apologies again, Valerie.
The Yummy:
So out came the wok and on came my invisible apron. I don’t like wearing an apron when I cook. The OCD in me doesn’t think I need one, but boy is she wrong. I won’t show you the mess I made on Mom’s stove. Valerie…shhhh
I made three dishes and Mom made two dishes plus a soup. I’ll have to say, being brought up in a Chinese home, we don’t care so much for the table setting, but the food must be good.

Mom’s Freshwater Prawns in Tomalley and Shrimp Paste.

My steamed Tilapia with ginger, garlic and green onions, finished with soy sauce drizzled in at the very end on top of everything.

Another plate of steamed Tilapia finished with soy sauce drizzled into the pan while sauteeing the ginger, garlic, and green onions because I prefer it this way while hubby prefers it the first way. Two slightly different dishes for two totally different eaters. Also allowed Valerie and Vanja to try both dishes.

I also made stir fried clams with black bean sauce.

The last dish I made was a stir-fried water spinach with fermented tofu (AKA fu yu ong choy in Chinese).

Mom’s super easy sesame chicken. (Recipe to come soon.)

My Mom also made a winter melon soup but I forgot to take a picture of it. I was probably too excited that the food was finally being served. I don’t function properly when I’m hungry.
There’s Valerie hard at work with her other camera. Oh come on food bloggers, you all know exactly what I’m talking about when I say “other camera(s)”.

Now I think I got her attention. Always a gorgeous smile for the camera from this gem. Yes Valerie, I remember “the rule”.

Getting to know the youngest in our family, my niece. If you’re a new reader and wondering why there’s so much hair product in the background, it’s because my parents own a salon and they live there too.

Finally the star of the night, Valerie’s kick butt Pavlova. I kid you not when I say this is THE BEST dessert I have ever eaten! Look how beautiful. It’s every bit as delicious as it looks!
Valerie and Vanja were so kind not only to bring a beautiful, delicious dessert, but they also brought gifts for my holy terrors and my parents (no, my parents were not the holy terrors I was referring to earlier…harhar). Thank you so much Valerie and Vanja, K and L really enjoyed their flashing glasses (L was so excited, he wouldn’t stand still for his picture)!

“Whose big piece of cake is this? “

“Hands off Dad, that’s MINE! Go get your own.”
Valerie and Vanja, I hope you both enjoyed the food and company as much as we enjoyed yours. Gotta love how food can bring together such cultural differences and create wonderful friendships such as these.

Kiddies getting ready for bed as Gary and I were about to head out to a Christmas party.
Happy Holidays from the luvtoeat family! I may be taking a blogging break for the holidays, but I’ll be by to visit your blogs as much as I can. This is a crazy time for us as K’s birthday is Christmas eve, and Gary’s is right after new years. Party hardy everyone, but always remember to party responsibly. Continue creating those wonderful bloggie friendships. Until next time, friends and family
If you don’t believe real friendships can be made through blogging, BELIEVE because here’s proof. My family and I had the pleasure of having the oh so inspiring Valerie from A Canadian Foodie and her very charming husband Vanja, over for dinner at my parent’s house. After Valerie invited hubby and I to her taste tripping party and my two holy terrors over again to her house for some cookie making fun, I knew I had to do something in return to thank her. So dinner and a lesson in making XO sauce it was (so I thought) . I’ll explain “so I thought” later.
If you haven’t met Valerie yet, you sure are missing out! Not only does this woman make amazing dishes from her own family recipes, but her enthusiasm and eagerness to learn makes her a human walking cookbook expanding with recipes by the day. She is one of the warmest, most sincere, generous and inspirational people you’ll ever meet. She sees no colour, difference in age or difference in sex when she welcomes you into her heart (and home). A true Canadian indeed.
This was the first time I really got to talk to Vanja and get to know him better. He’s quite the gentleman and very charming, might I add; even offered to wash dishes after dinner. Valerie, you’ve got a keeper there
The Bad:
I wanted to invite Valerie over to my house, but since my Mom was going to demonstrate her XO sauce, I thought it’d be better to have the dinner and lesson at my parents’ house. Turned out, Mom misunderstood me. She thought I wanted her to show us just the ingredients and explain her method. There was no demonstration. I was so embarrassed and disappointed, but I had to keep my cool as I didn’t want to ruin the rest of the evening. My apologies again, Valerie.
The Yummy:
So out came the wok and on came my invisible apron. I don’t like wearing an apron when I cook. The OCD in me doesn’t think I need one, but boy is she wrong. I won’t show you the mess I made on Mom’s stove. Valerie…shhhh
I made three dishes and Mom made two dishes plus a soup. I’ll have to say, being brought up in a Chinese home, we don’t care so much for the table setting, but the food must be good.

Mom’s Freshwater Prawns in Tomalley and Shrimp Paste.

My steamed Tilapia with ginger, garlic and green onions, finished with soy sauce drizzled in at the very end on top of everything.

Another plate of steamed Tilapia finished with soy sauce drizzled into the pan while sauteeing the ginger, garlic, and green onions because I prefer it this way while hubby prefers it the first way. Two slightly different dishes for two totally different eaters. Also allowed Valerie and Vanja to try both dishes.

I also made stir fried clams with black bean sauce.

The last dish I made was a stir-fried water spinach with fermented tofu (AKA fu yu ong choy in Chinese).

Mom’s super easy sesame chicken. (Recipe to come soon.)

My Mom also made a winter melon soup but I forgot to take a picture of it. I was probably too excited that the food was finally being served. I don’t function properly when I’m hungry.
There’s Valerie hard at work with her other camera. Oh come on food bloggers, you all know exactly what I’m talking about when I say “other camera(s)”.

Now I think I got her attention. Always a gorgeous smile for the camera from this gem. Yes Valerie, I remember “the rule”.

Getting to know the youngest in our family, my niece. If you’re a new reader and wondering why there’s so much hair product in the background, it’s because my parents own a salon and they live there too.

Finally the star of the night, Valerie’s kick butt Pavlova. I kid you not when I say this is THE BEST dessert I have ever eaten! Look how beautiful. It’s every bit as delicious as it looks!

Valerie and Vanja were so kind not only to bring a beautiful, delicious dessert, but they also brought gifts for my holy terrors and my parents (no, my parents were not the holy terrors I was referring to earlier…harhar). Thank you so much Valerie and Vanja, K and L really enjoyed their flashing glasses (L was so excited, he wouldn’t stand still for his picture)!

“Whose big piece of cake is this? “

“Hands off Dad, that’s MINE! Go get your own.”
Valerie and Vanja, I hope you both enjoyed the food and company as much as we enjoyed yours. Gotta love how food can bring together such cultural differences and create wonderful friendships such as these.

Kiddies getting ready for bed as Gary and I were about to head out to a Christmas party.
Happy Holidays from the luvtoeat family! I may be taking a blogging break for the holidays, but I’ll be by to visit your blogs as much as I can. This is a crazy time for us as K’s birthday is Christmas eve, and Gary’s is right after new years. Party hardy everyone, but always remember to party responsibly. Continue creating those wonderful bloggie friendships. Until next time, friends and family
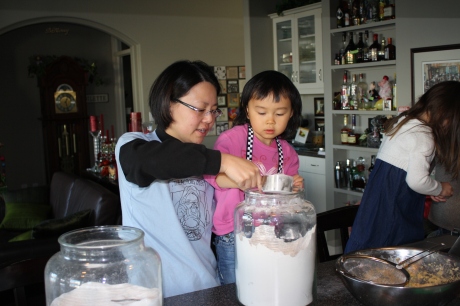
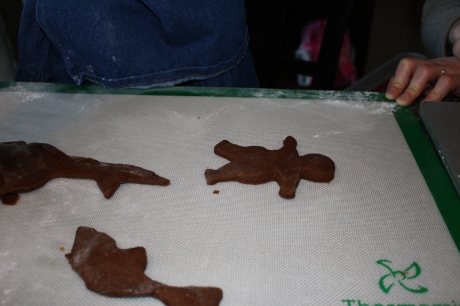
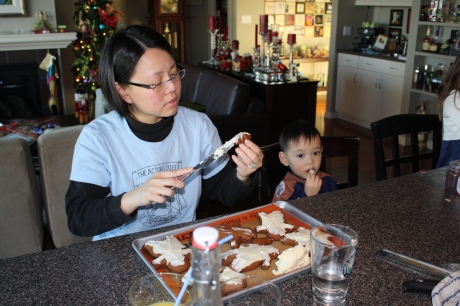
Do you believe in magic…

…in a young girl’s heart? (Love that song.)

Cookie making magic that is.


When Valerie of A Canadian Foodie invited my daughter K and Kevin’s daughter Miss. E over to her house for some cookie making, I knew there was going to be some magic in the air. I just wasn’t prepared for how much magic. Check it out:


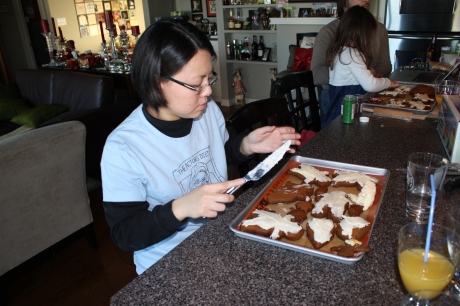
As if baking huge gingerbread men and sugar cookies weren’t enough, the kids got to choose a toy from Santa’s bag too!

Valerie, you sure do love Christmas! That’s my kinda gal!
The kids got to make delicious gingerbread men and sugar cookies, decorate their cookies, enjoyed some play time together, and choose a toy from Santa’s toy bag. There were way too many pictures to post on here so I chose the best ones and put them in a slideshow cause I’m so OCD like that


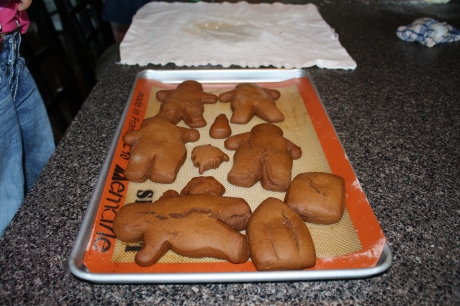


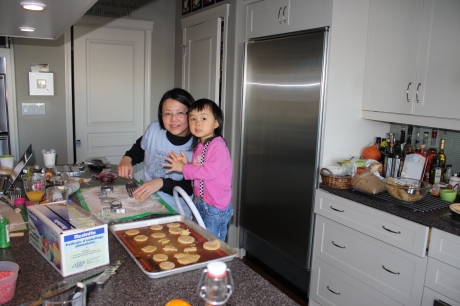


Now K has gingerbread men to go along with her gingerbread house she made last weekend.


To be fair, the house was pre-made. She just had to decorate it and make the tree.

Ok, so the gingerbread men were kind of big for the house, but you can’t have everything perfect, right?
Thank you Valerie for creating such a magical day for my kiddies! I think cookie making will be a tradition we’ll be enjoying every Christmas. Check out Valerie’s post for more pictures and a rockin’ Christmas poem she wrote. What do you enjoy most about the holidays?
So did I get that song in your head? Well in case I did, here’s a video of the song along with the lyrics. Until next time, friends and family. Enjoy!
No comments:
Post a Comment